Thursday, April 30, 2009

Happy, Happy Birthday Baby!


My baby-doll turns 15 today!!

Every age has it’s trials and tribulations… first they can’t tell you where they hurt, then the teeth come in and the drool fountains begin, then of course there’s graduating from toddling to walking, the first day of school, losing the teeth, riding a bike, their age hitting the double digits, then the teen years, first day of jr. high, then high school, the first ‘big’ school dance – and the latest we’ve experienced in our house: the first kiss, and first love…wow – so many awesome as well as heartbreaking events!

And now my Minners is 15. It seems so much older than 14 – maybe because it’s right before 16 with the driving and the new freedom she’ll have.

I hate to use the old cliché ‘how time flies’, but man…it really does, ya know? Seems like yesterday that she’d want to sleep at the foot of our bed every night and now – we’re lucky if she comes out of her room at all...ever! I can actually miss her when she’s home!

Anyway – I love her more than life itself, she makes every day better than the last and even though she has a TON of her dads traits and habits I love her to the world’s end ;-)

HAPPY BIRTHDAY MINNY!!!!!!


Monday, April 20, 2009

Pizza Any Way We Can Get It.....


I could just about marry this picture - that's how much I love it. Doughy, cheesy, juicy - I'm asking you, does it get any better?! This is the pizza I made for my daughter yesterday before it went into the oven. Yes, this is the 'before' picture and - to me - it's better looking than the 'after'...
Though the 'after' don't suck -know what I'm sayin'?!?! ;-) This pizza is an individual-sized pie and it's extra velvety in that it has an added extra ingredient - now, don't hate.....and Paula Deen, if yer out there sweetheart, show me some love - cause the secret ingredient is....mayo. Now calm down, calm down, it's just a touch of mayo. Jeeze-Louise, the cheese in a pizza alone could kill ya so let's not fret over a little Best Foods!

Made on a crust that I stretched from a fresh ball of dough from the grocery store (the in-house pizza place makes and sells balls of dough in the cheese/meat dept), the topping is simple and heavenly delicious. Sprinkle the dough with just a little mozzerella, top with sliced roma tomatoes, then plop down spoonfuls of of a mixture of mozz, crushed garlic, fresh chopped basil and enough mayo to just bind the cheese - no soupy glop goin on here! Carefully spread the cheese mixture over and around the tomatoes, then bake till it's bubblin' and the crust golden. Want specific measurements? Let me know! Meanwhile....

The rest of the ball of dough was stretched into more individual-sized crusts and brushed with olive oil.

And just look how happy it got after it took a nice tan on the bbq! Soft brown with terrific grill marks - just the way we like it! The crusts then came back inside the house to be topped with all sorts of goodness.... Grilled peppers and onions, turkey pepperoni, cheese and grilled shrimp!

This is my husband's creation - believe me, there are tons of veggies under all that shrimp and pep! It's the fun of individual grilled (or oven) pizzas - everyone gets what they want. Mine was equally as good - just not as pretty....this time - so his gets the limelight....this one time :-)

Pizza on the grill is easy and so totally yummy. If you've never tried it, make this the spring/summer you give it a go. You can have traditional toppings or the veggie route is especially good in the grilling season - but you could use chicken, herbs and spices, funky cheeses, salmon - the possibilities are endless! While grilled meats and chicken are really tsaty, they can get a tad boring if you cook-out a lot- so try something different and delicious! Grilled pizza is summer bbq fun!

Wednesday, March 18, 2009

Irish Day My Way...


I’m not Irish and I’ve never been one to celebrate St. Patrick’s Day in any way other than to have a few beers – although SOME people seem to think the beer I drink is merely light gold water. Coors Light, I love you. Anyhoo…..I have a friend who makes an ‘Irish meal’ each and every year (she’s not Irish either) for her family of three. She makes corned beef and cabbage….I could never…’cause I hate it. Quick story: my mom is a great cook, and I do mean great. The only things I never liked was tarragon chicken in white wine (because I hate tarragon and I hate alcohol/wine taste in my food) and corned beef, because, well, it was just weird! It ruined a perfectly good pat roast – which I adore. Plus…the one time she made corned beef , the leftovers went in the fridge and the odor/taste of it permeated the milk through the old-fashioned cardboard carton. I remember going to the kitchen to take a big ol’ swig of milk and ‘EWWWWWWWW!” All I got was a mouth full of liquid, white, corned beef! Freaked me out! So, no corned beef for me…..and I’ve tossed pastrami right along in there too ‘cause to me, birds of a feather, know what I’m sayin’? So anyway, I was feeling like I wasn’t fulfilling my duties as a mother by not getting into the spirit of the Irish on this day of green beer, so I decided to make an Irish dish my family would like. I thought of Colcannon – mashed taters with boiled, shredded cabbage, ham or bacon and onions – yum! But then I figured that boiled cabbage – mixed with tates or bacon or even chocolate for that matter! – was not on any teenaged girls list of ‘things I want to eat’. So, I decided on something else I’ve wanted to make lots of times but never had: Shepherd’s Pie….and am I glad I did. Hot, steamy, creamy, savory – and best of all cheap. Does it get any better? I didn’t follow a recipe…I’ve seen a million of them over the years – so I kinda knew what it was all about. I just tossed my own thoughts in the pot. You can to….as long as you have a meat concoction on the bottom and smashed tatoes on the top, it’s pretty much Shepherd’s Pie! Not up to it? Here’s what I did….

Shepherd’s Pie
1 T olive oil
I small/medium onion, diced1 ½ pounds ground beef
2 cloves garlic, crushed
2 T flour
1 small can tomato paste
2 packets brown gravy mix, whisked into 2 cups water
½ package frozen peas/carrots medley
½ package frozen corn
Additional water if needed
2 pouches instant mashed potatoes (I know, I know! Lazy! But hey…some weeknights call for ‘instant’ gratification!) – prepared according to package directions.
Optional – ½ cup shredded cheddar and ½ small can Durkee French Fried Onions

Preheat oven to 350-degrees. Cook onions in large frying pan in olive oil over medium high heat until they begin to turn translucent. Add ground beef and garlic, cooking and stirring until meat is crumbled and just cooked through. Sprinkle with the 2 T flour and mix in well. Add in tomato paste and combined well. Pour in the gravy mix that’s already been mixed with the water along with half of each bag of frozen veggies then bring to a boil. Mixture will thicken quickly. If it gets too thick (you don’t want ‘clay’ but you don’t want ‘soup’ either. You want loose-ish ‘chili’. Know what I mean? If your mixture is too thick, add in more water, about a ½ cup at a time, stirring well to incorporate (if too thin, add in a little more four, but I assure you, this will not be too thin). Once meat mixture is done, spoon it evenly into a 2 quart casserole dish. Next, spoon the potatoes on top of the meat mixture and spread them evenly all the way to the edges. Sprinkle with shredded cheddar and Durkees if desired. Bake for approx. 15-20 minutes or until top is golden brown and sides are bubbling. Enjoy!!!

Monday, March 9, 2009

I got baked on Sunday...


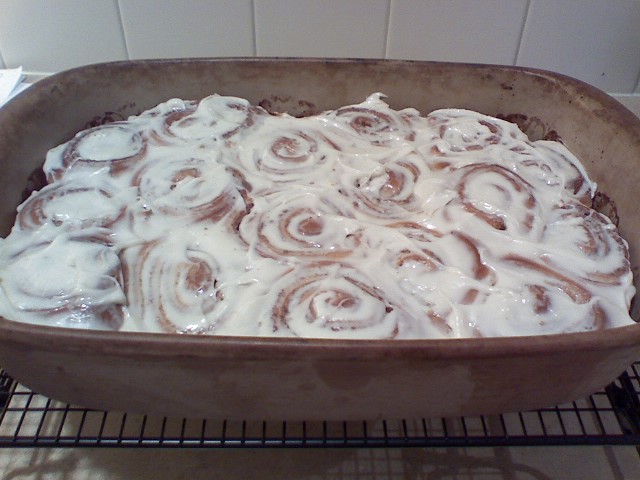
This passed Sunday was a great day. Woke to a very light dusting of snow – and I do man VERY light – but it was enough to give me the baking bug! So after a relaxing morning of coffee and picking up around the house, I grabbed a couple of cookbooks and dug in. While grocery shopping on Saturday, I’d anticipated the ‘Homey-Sunday’, so I bought some yeast in the hopes of tackling homemade cinnamon rolls! I hadn’t made them since high school, and like my previous post of making a really good, flaky pie crust, there is a certain level of scariness to making yeast products. But, I figured, what was the worst that could happen? The dough wouldn’t rise and I’d have flat rolls…I was willing to take the risk. The mixing was easy – and a thermometer I always forget I have allowed me to make sure my warm water wasn’t too hot or too cool to active (or not) the yeast. I covered the dough with a towel and let it rise on top of our clothes dryer that was going ALL day long (we got a ton of laundry done yesterday!) I made a to-die-for cream cheese frosting for the rolls as prefer it to a regular glaze. We had the rolls for dessert after a wonderful Sunday dinner of pot roast, green beans with onions and bacon and mashed potatoes. And as heavenly as they were…I was actually able to limit myself to one! THAT was the miracle of the day!
Above is the full pan – baked in my Pampered Chef stoneware 9x13 pan. It bakes really well…tender edges…not hard and crunchy. Here’s a close-up of the warm, sweet, soft, heavenly treat. Mmmmmmm……

While the cinnamon roll dough was rising for the first time atop the dryer, I noticed several bananas going to waste in the fruit bowl. We eat a LOT of bananas in our house, but as hard as you try to not let it happen, a couple go to waste by the end of each week. While I normally toss the aged-spotted nanners – and it kills me to do so because I KNOW I’ll just be buying more the very next day – yesterday…since I as in a baking mood anyway, I made some banana bread. Two caramel-colored loaves baked up in my stoneware loaf pans and I froze one after it cooled to take on an upcoming camping trip over Spring Break. The other…it’ll happily grace our lunch boxes and breakfast plates throughout the week. Lucky for our tummies!! Here’s the moist and flavorful banana bread. Such a nice sweet to have around the house from time to time…

I’m not posting recipes for the cinnamon rolls or banana bread. The cinnamon rolls and banana bread came from my Betty Crocker cookbook – a pretty standard manual in most kitchens. But the cream cheese icing was from a Pillsbury cookbook that has come in handy for me many times. The frosting was so killer - and easy – I just have to share.

Cream Cheese Icing -
3 cups powdered sugar
1 8oz. brick cream cheese – softened
2 T. butter
1 t. vanilla
Mix all ingredients together in stand mixer or with hand mixer until light and fluffy – about 5 minutes. That’s it! EASY!!

Sunday was truly a SWEET day!!!

Friday, March 6, 2009

Mexican Lasagna


I wish this picture was better! This is some Mexican Lasagna that I made up the night before last. It is creamy, oozy (yes, oozy it totally a word) and makes you close your eyes with delicious delight with every bite. And in case you’re wondering, the answer is yes…I am a VERY good self-back-patter. But you probably figured that one out yourself. Anyhoo…back to the photo….I scarfed my dinner down so fast and completely the first night we had this, I forgot to take a pic before putting the leftovers in the fridge. So this pic is from night #2 just after coming out of the oven. While it was still very creamy, albeit a little less oozy on round two (like so many dishes are), it was still supremely yummy and I had to get a photo before it disappeared into my belly.This recipe is easy although I know it does seem to have a plenty of ingredients. But what can I say…I made it up while at work then played with the ingredients as I made it. I’d have tried it a few more times and maybe flipped it around a bit before writing it down, but it was so utterly fantaz, this is the final version from the get-go. One thing though…I’da probably used ground turkey if I’d had it, but I’d already thawed some hamburger, so I used that. You use whatever curls your toes. Annnnd….I usually note the size (ounces) of the cans I used, but I didn’t expect to actually fall head over heels in love with this! So, I’ve listed cans as small, large, regular etc...I bet you’ll get the meaning on your own ;-)

Mexican Lasagna
Ingredients:
Drizzle of olive oil1 ½ lbs ground beef or turkey1 small onion – diced
3 cloves garlic – crushed
1 small can chopped green chilies
Salt, pepper, garlic & onion powder
1 envelope taco seasoning - divided
12-14 white corn tortillas – 6” diameter
1 8 oz. brick cream cheese - softened
1 reg. size can diced tomatoes –do not drain
1 can Campbell’s Fiesta Nacho Cheese soup
1 can enchilada sauce - 1/3 can reserved
1 ½ cups shredded cheddar cheese
1 ½ cups shredded jack cheese
1 small can black olives

Drizzle some olive oil into a skillet and cook the onions until they begin to soften, add garlic, ground meat, salt, pepper, garlic & onion powder. Break up meat in pan to crumble and add 2/3 of the taco seasoning envelope. Cook meat until it’s cooked through. Drain off any fat. While meat is cooking, combine brick of cream cheese and can of diced tomatoes and remainder of taco seasoning envelope. Stir with whisk until well incorporated – cream cheese may stay a tiny bit lumpy...that’s okay. In another bowl, stir together nacho cheese soup and 2/3 can enchilada sauce. Shred both cheddar and jack cheeses. Once all components re ready, it’s time to assemble. In bottom of 9 x 13 pan, pour remaining 1/3 can enchilada sauce and tip the pan around so the sauce coats the whole bottom. Using about 5 ½ tortillas, lay them on top of the enchilada sauce, folding/breaking a small piece off one edge so they can lay flat against the side of the pan. Just piece them together best you can but you don’t want tons of over-layering. Using 1/3 of the cream cheese mixture, spoon globs atop the tortillas and spread out pretty evenly. Next, spoon 1/3 of soup mixture and spread it out as well. Evenly sprinkle 1/3 of the meat atop the soup then top the meat with 1/3 of each of the cheeses. Repeat these two layers twice more to make three layers in all, ending with the sprinkling of the two cheeses, then top it all off with the small can of sliced olives. Bake in a preheated 350-degree oven for 30 to 38 minutes. Let sit for about 5 minutes before cutting and serving. YUMMY!!!!!

Monday, March 2, 2009

Award-Winning Brownies...?


I found the recipe for these brownies on a site I mentiond in a previous post -Bakerella. They looked so good! I had told my Mother-in-Law about Bakerella as she likes food as much as I do and she promptly made these brownies for a brownie contest at her office. Well, she won! I thought that was pretty cool!

So - this past Saturday, I thought I'd whip up a batch of these 'award-winning' treats. They're super simple....a box of brownie mix prepared as the package instructs, then, you mix up a pouch of Betty Crocker Chocolate Chip cookies - also according to package directions. You plop little scoops of the cookie batter all over the prepared brownie batter in the pan. Push the blobs down slightly, then bake for 25 - 30 minutes. They looked great and I almoast hated covering them with the chocolate ganache as the recipe calls for - but I did.

I do have to admit, these were great....while warm. But isn't every baked good better when warm? The next morning, after they'd cooled...I felt like they were just brownies. WAY chocolatly brownies....like..did I say WAY, WAY chocolatly?! You couldn't taste any chocolate chip cookie dough - and that's what I was couinting on...the slight salty flavor from that dough mixed in with the brownie. But all I tasted - was brownie. What a waste of a perfectly good cookie dough mix! And although we usually make cookies from scratch, in a pinch, these Betty Crocker pouches have saved my daughter's sweet tooth VERY satisfactorily. They are great cookies. In this recipe, though...they just got lost :-(

Maybe I'll try these again sometime made with a peanut butter cookie mix instead of the chocolatye chip. Maybe the peanut butter could hold it's own a little more in all that chocolate. For that matter....the ganache could take a powder as well.

Time will tell...and I'll let you know!

Have a sweet day!

Tuesday, February 17, 2009

Cupcake Pops in the House!

Well, here are my little darlings! Aren't they cute?! They were easy - although a bit time consuming and guess what? Candy Melts don't taste like doo-doo after all! The chocolate tasted chocolatey and the vanilla had a good white chocolate taste as well. I'd use them again although I don't know that they were tons different than working with real white and brown chocolate.

So...was there ANY drawback to making these sweet, little gems that make you smile just by looking at them? Um.....unfortunately, to me, yes. And it was a doozy of a drawback at that. I didn't like the way way they tasted. Isn't that awful?! After all the work and how gosh-darn cute they are I didn't enjoy eating them...like, at all. Maybe super cold, straight-from-the-freezer they'd be better - and oh, alright...I'll give them once more chance by trying that tonight. Twist my arm! My daughter loved them, my husband hasn't eaten one them yet - he's not really into sweets that much. Anyway...I made the pops as the recipe stated, using the red velvet cake and the cream cheese frosting. Red velet cake pretty much tastes like chocolate, but milder (to me). Next time - if there is a next time - and I do kind of feel like I should try them again at some point - I think I'll use dark chocoalte cake and dark chocolate frosting. I want a bigger 'punch' of taste and these ones really made me feel like there was hardly any flavor at all. Secondly, the texture is something that takes a little getting used to. It's cake 'clay' and when eaten at room temp, well...it's just weird. Maybe it's the fact that they're red inside.....blood red. And how how many blood red things do you ever eat? Eating something chocolatey that's also brown might help me.

Either way, you can't deny that these cupcake pops are a sight for your eyes - cute as a button and as bright as a ray of sunshine. For that reason alone I'll have to give them another chance - I just hope their taste rises to their appearance!