Showing posts with label Thanksgiving. Show all posts

Monday, November 22, 2010

Happy Thanksgiving!

In my own humble opinion, this pumpkin pie looks good enough to eat – but you might notice the hardware that’d make it a tad hard to swallow! That’s because this isn’t real pumpkin pie….they are charms made of polymer clay!

Thanksgiving is my favorite holiday - anyone who calls my house on TG gets a turkey greeting (I have a mean gobble, thank you very much)!

Anyhoo - I made a bunch of these for some of the ladies in my life that I not only adore, but get to see at Thanksgiving time. I love working with polymer clay – and being the food addict that I am, my favorite thing to make with the clay is…food ;-)

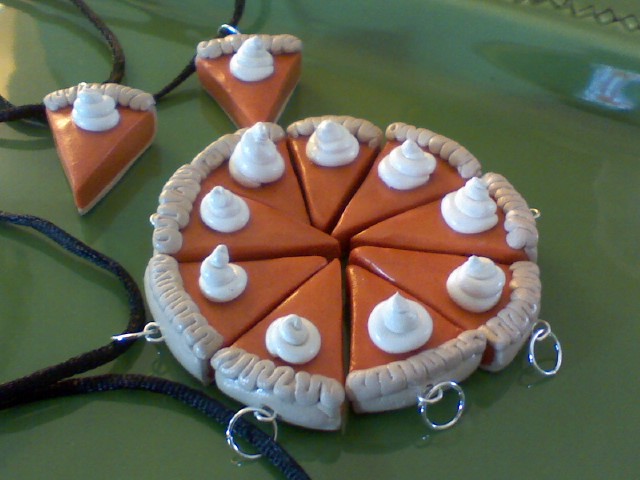
I made the tiny pies then made wire loops and inserted them into the back crust. Once they were baked, I attached a ring and strung the charms onto black cord necklaces.

Because I didn’t want the recipients to wear the necklace only a few days, I also made Christmas charms - not all food…

....and let each wonderful woman...
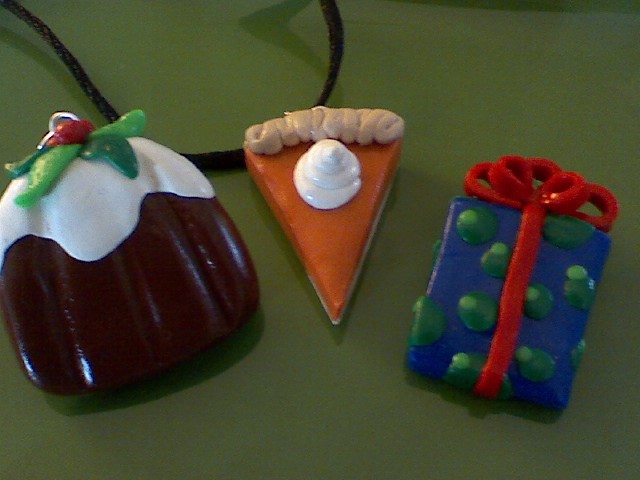
...pick the one they wanted most.

This first batch of charms were given this past weekend……then I went home and went kinda charm nutty and made……

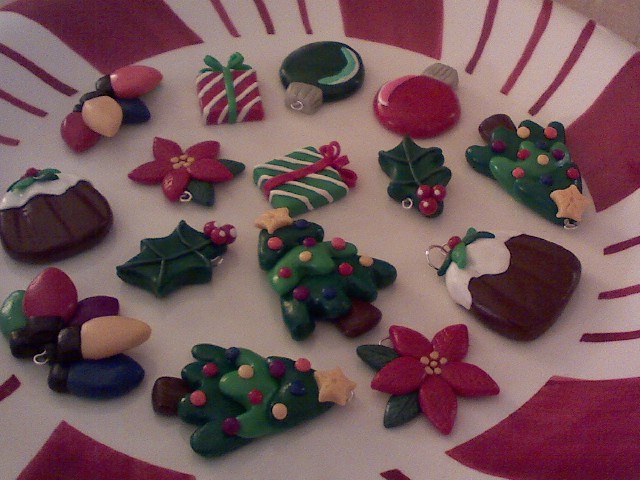
…all of these! Somehow my hands worked liked the wind and I busted all of them out in a couple of hours.

I’m not sure which one is my fave…the hubs likes the presents the best. I really like the ‘Christmas Pudding’ though and the poinsettia ;-) I think my big sis will snag one of the Christmas Lights charms but what anyone else will pick is…well…anyone’s guess!

I had all the stuff on hand to make all of these charms, but should you choose to do some yourself, it doesn’t have to cost you an arm and a leg. Watch for coupons to your local Michael’s, Joann’s or other craft store and you can save big!

With that I’ll wish you a very Happy Thanksgiving ;-) Here’s hoping you don’t get too full and that you make warm family memories to take you into this joyous holiday season!

By the way - to all my family and friends...I love all of you! I am so lucky to have you in my life. All of you are what I'm thankful for every day of the year.

Tuesday, December 1, 2009

Brand New Leftover Stuffing....

What's better than fresh-made stuffing on Thanksgiving day? Crispy, fried stuffing the next day! I made the stuffing for this year's feast. We had fewer people than normal and let's face it, I didn't think two bags of stuffing bread cubes (I'd bought three) would make so much! A good amount of stuffing went home with family in plastic containers, and there was still some left to bring home for ourselves. I didn't want to simply reheat the stuffing, but wanted to make it seem new and different for a whole new dinner.
While heating about 2 tablespoons olive oil along with 1 tablespoon butter in a large, non-stick frying pan, I put aproximately 2 to 3 cups of leftover stuffing in a mixing bowl, added one egg and mixed it by hand to combine it well. I then formed a medium, palm-sized ball into a patty shape (about 3 inches diameter) and gently pressed each side in regular-joe bread crumbs (woulda loved to use panko...but I was out). I then fried each side over medium heat until golden brown...about 3 to 4 minutes per side.
The insides were creamy and full of clasic stuffing flavor while the outsides had just the right amount of crunchy crust to contrast the inner, hot, fluffiness. These were awesome with a hot veg and small steak but I gotta say I think they'd be awesome with a fried egg on top for breakfast! Have to try that next time!

Wednesday, November 18, 2009

TP & PT @ TG!

What do toilet paper and paper towel rolls have to do with Thanksgiving? Everything when you can create an entire Pilgrim Population out of them!
I mean – is this just one of the cutest little guy ever?! You can make him for yourself with the empty rolls, some construction paper, a black felt tip pen and some glue! I have to admit, my daughter and I made these years ago – but they are sturdy and store easily for use year after year. I don’t have patterns for you, but just eye-balling these is pattern enough really… I don’t remember where I originally saw this fun project…in a magazine? Online somewhere? Wherever it was, my daughter and I were able to easily create our own little village of people!
The turkeys are made with small pinecones and a few of those sponge/foam sheets from your local arts-n-crafts store. It’s good to have a hot glue gun for the turkeys too.
I know times are tight – so if you don’t have the meant to get the materials for the turkeys (you might already have everything on hand...I did!), the smiling Pilgrims and Indians will bring smile to your diner’s faces all the same.

And…..
You can even make napkin rings!
I adore these and they are So perfect on my Thanksgiving table!
This is the perfect weekend arts-n-crafts project for the whole family – and you’ll have a super fun, homemade centerpiece for Thanksgiving come Thursday!

Like I said, I don’t have exact patterns for you but here are directions from my head. Please…don’t over-think any of this. It’s an easy project and there’s no exact way they have to look – just have fun with it!

Materials for Pilgrims/Indians
6 empty toilet paper rolls (to make 2 Indians, 2 girl and 2 boy Pilgrims)
Construction paper – various colors:
light pink or flesh/tan (for skin)
black & white (for Pilgrim clothing & hair)
yellow, orange & brown (for Indian clothing & hair)
Black, fine tip, felt tip pen
Pink felt tip pen
All-purpose glue

Cut a 1 ½ inch wide strip of paper long enough to wrap around the TP tube for the character’s face and glue it in place (tip, I cut all the pieces – faces, clothing, aprons etc. - out first then glue everything on assembly line style). The piece used for the clothing obviously needs to be big enough to cover from the bottom of the face to the end of the tube and needs to wrap around the tube as well. The black on the Pilgrim can be left plain as you’ll glue a ‘bib’ on each and an apron on the girls. On the Indian’s clothing, use the black felt pen to draw on a beaded necklace. For the apron on the girl Pilgrim, you more or less cut a half circle and give it a scalloped edge for decoration - make it join in the back. Cut an oval, then cut the oval in half for the ‘bib’ part of the Pilgrim outfit. Draw little black buttons on with the felt pen. Also draw on the facial features – you can be detailed or simple like the ones shown above. For rosey cheeks, color the tip of your finger with a pink felt tip pen and lightly blot your finger on each cheek. For the hair on the girls and Indians, cut a rectangle 2 ½ inches long and wide enough to span from one side of their face to the other – make vertical cuts for the ‘strands’. The boy Pilgrim should have bangs and shorter hair – so cut a 2 inch long strip that wraps around the tube, then cut out a section for bangs so his face will show, then make the vertical cuts for the ‘strands’. Lastly, headgear… For the Indians, cut one or two small feather shapes and glue in place. Then, cut a ½ inch strip that will wrap around the tube. Before gluing in place, use the black pen to draw a zigzag decoration. For the girl pilgrim, cut a rectangle 4x3 inches and fold a ¼ inch ‘cuff’ along the 4” side. Bend the shape into a cone by overlapping & gluing the two 4” corners opposite the cuff side. Let dry. When dry, squeeze a thin line of glue along the top rim of the girls ‘head’ and place her hat on her head, gently pressing. Let dry. For the boys hat, cut a 2 ½ inch tall strip long enough to wrap around the tube. Glue in place. The trickiest part is brim… Draw the circumference of the tube onto the black paper. Draw a smaller circle about an 1/8 of an inch inside that circle and a second circle ½ outside of it. Cut out using the outside circle as your guide, then cut out the middle using the inner most circle as your guide. Then, every 1/8 inch or so, make tiny snips from the inner circle to the original circumference circle line. Bend all the snipped ‘tabs’ up in the same direction and slide onto the Pilgrim boy tube, stopping where his face begins. Bend out each tab and put a tiny dot of glue on each, then press the tab in, attaching it to the form of the hat. Decorate the hat with a white strip and yellow buckle. Let dry.

For the napkin rings, cut 6 to 7 equal size rings from two, empty, paper towel rolls. Cover each ring with a strip of paper - make them all the same or use all different fall colors! Cut out fall leaf shapes by hand or use a small cookie cutter as a pattern. Cut out one acorn shape for each ring from brown paper, then draw the top of each acorn with a black felt pen. Glue two leaves on to each ring (make sure the leaf colors are different fro the ring!) then glue on an acorn to each ring as well. Let dry.


Materials for turkeys:
One pine cone for each turkey
Hot glue gun and slue sticks
Sponge craft sheets – red, yellow, green, orange, white & brown
Black felt tip pen

Cut five ‘feathers’ for each turkey – one from each color. Cut two white eyes per turkey as well as one wattle (that hangy red thing), one yellow beak and one head. When cutting the head shape, make it approx 3 inches long with a rounded head shape at one end and a tapered straight edge at the other end. Glue on the eyes, wattle and beak – draw pupils on the eyes. Set each pinecone on its side on your work so it sits still and sturdy. Once level and sturdy you now know what will be the bottom and top of your turkey. Using the hot glue gun, pipe a blob of glue near the front of the pinecone, down inside the ‘shingles’ and push the tapered end of the head shape into the glue and hold till set. Pipe blobs of glue toward the back of the pinecone, again down inside the ‘shingles’ and stick a ‘feather’ into the glue and hold till set. Follow by more glue and another color fo feather, slightly overlapping the first feather and repeat until all five feathers have been attached (you might want to stick the feathers in the pinecone to dry set them before gluing them). Let dry.

Have fun!