Showing posts with label Holiday. Show all posts

Monday, November 22, 2010

Happy Thanksgiving!

In my own humble opinion, this pumpkin pie looks good enough to eat – but you might notice the hardware that’d make it a tad hard to swallow! That’s because this isn’t real pumpkin pie….they are charms made of polymer clay!

Thanksgiving is my favorite holiday - anyone who calls my house on TG gets a turkey greeting (I have a mean gobble, thank you very much)!

Anyhoo - I made a bunch of these for some of the ladies in my life that I not only adore, but get to see at Thanksgiving time. I love working with polymer clay – and being the food addict that I am, my favorite thing to make with the clay is…food ;-)
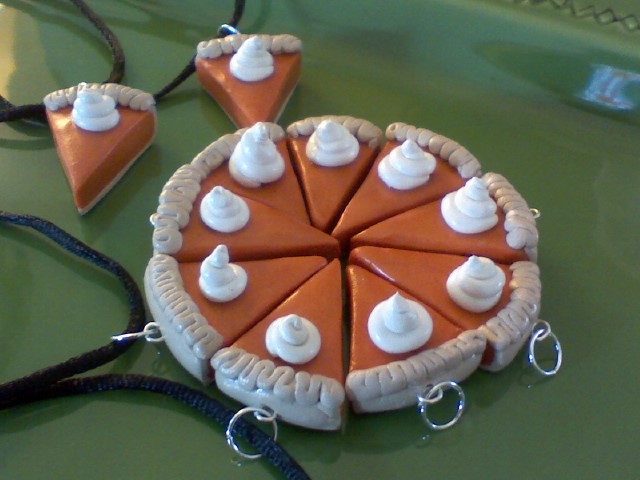
I made the tiny pies then made wire loops and inserted them into the back crust. Once they were baked, I attached a ring and strung the charms onto black cord necklaces.

Because I didn’t want the recipients to wear the necklace only a few days, I also made Christmas charms - not all food…

....and let each wonderful woman...
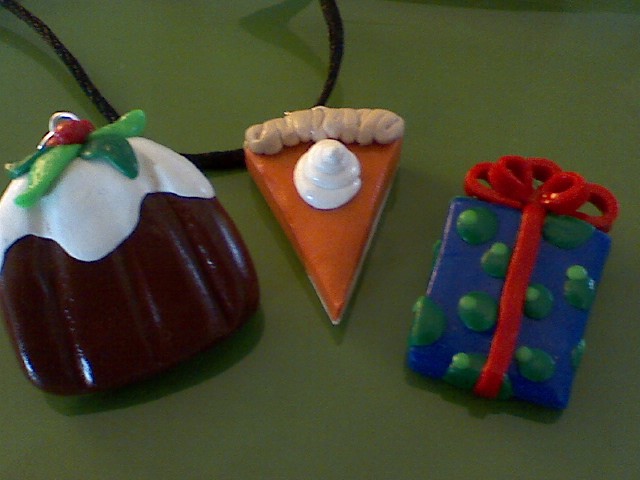
...pick the one they wanted most.

This first batch of charms were given this past weekend……then I went home and went kinda charm nutty and made……
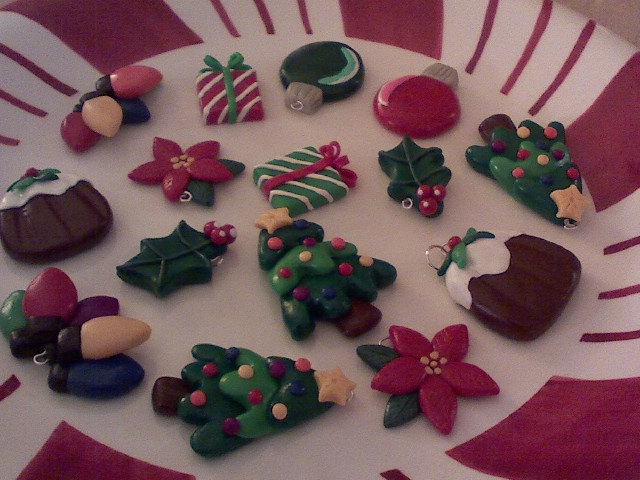
…all of these! Somehow my hands worked liked the wind and I busted all of them out in a couple of hours.

I’m not sure which one is my fave…the hubs likes the presents the best. I really like the ‘Christmas Pudding’ though and the poinsettia ;-) I think my big sis will snag one of the Christmas Lights charms but what anyone else will pick is…well…anyone’s guess!

I had all the stuff on hand to make all of these charms, but should you choose to do some yourself, it doesn’t have to cost you an arm and a leg. Watch for coupons to your local Michael’s, Joann’s or other craft store and you can save big!

With that I’ll wish you a very Happy Thanksgiving ;-) Here’s hoping you don’t get too full and that you make warm family memories to take you into this joyous holiday season!

By the way - to all my family and friends...I love all of you! I am so lucky to have you in my life. All of you are what I'm thankful for every day of the year.

Tuesday, February 16, 2010

Dinner From The Heart.....

Love comes in many forms and when it's in the form of food - I'm happy, happy! This is the meal I made for the hubs, my daughter and my mom for Valentine's Day - and I got 'hearts' in wherever I could! Individual heart-shaped meatloaves (perfect becasue I LOVE meatloaf!), heart-shaped breadsticks, my special mashed tates with heart-shaped butter and a new broccoli dish that I knew we'd all love!
I think making a meal, such as this, extra special comes in the details. Like these heart-shaped butters. I just cut a pat of butter from a little-cooler-than-room-temperature butter and used a very small, heart cookie cutter to cut out the shape. After all were formed, I covered them and put them in the fridge until I was ready to place them into the piping hot mashed taters.
I bought refridgerated breadsticks (garlic ones...but the come in plain as well), twisted them as instructed, then formed them into hearts too! Once they were baked, I brushed each with hot, melted butter. Did I meniton there was no dieting in sight on this Valentine's Day?!
I DO have to say I make a bitchin' meat loaf (recipe to come at a later date), but instead of making one large one that would normally be served in slices, I took a good handful of the meat mixture and molded it into a heart shape, chilled them, then baked them on a sheet pan for about 40 minutes. With the tangy and delicious, red glaze, the look perfect for Valentine's Day!
Look for the recipe for this to-die-for broccoli recipe to come soon as well. I'll do a step-by-step on this one. I can hardly wait to have it again. I combines both roasted broc as well as flourettes that have been cooked with cream and garlic (then creamed with an immersion blender). The flavor is incredible!
I can't believe I forgot to snap a pic of this heavenly dessert before I scooped off the first serving! This is called Coure la Creme and it is the silkiest, creamiest, lightest & fluffiest thing you'll ever eat! It's super easy - and although it does call for a certain heart-shaped, ceramic mold, the mold isn't a must - which means everyone can have the opportunity to create this wonderfully light dessert that's served with raspberry sauce. It was the perfect ending to a LOVEly Valentine's Day dinner.
I hope your Valentine's Day was fillled with love!

Friday, February 12, 2010

Happy Valentine's Day Cookies!

It's almost Valentine's Day! And I LOVE making pretty, sparkly Vanlentine's cookies!
My daughter and her BFF get their very own, monster-sized cookie, 'cuz love them monster-size!
The rest get all kinds of icing, sprinkles and sugars to please everyone else I love!
Yummy.......
Hello sweet, sugary calories!
Valentine cookie jewels :-)
A tasty, good afternoon's project and a LOVEly treat for your the people you love!
Have a sweet-n-lovely Valentine's Day! I send much love to you!!!

Wednesday, December 30, 2009

The new year is just about 30 hours away - this wil be my last post for the year. I wish everyone who peruses this little blog, a happy and safe New Years Eve...things can get so crazy out there, eh? I prefer staying home and actually, I don't care if I'm in bed before 12! Fireworks woke me up last year ;-)

I've got the usual resolution....get in shape, shed that weight - and I vow to be victorious! Come Hell or high water I'll look like a million bucks by summer!

I hope all of you dig right in to your resolutions if you set them and you succeed as well!

HAPPY NEW YEAR!!!

Tuesday, December 22, 2009


The count-down is on...Christmas is in just a few days. I'm so excited! I love the time we get to share with family for days in a row. My sister's birthday in on the 23rd so the celebration for her always kicks off the gatherings for the rest of us! I love the laughter, the food, the feelings that are so spceial to this particular time of year.... everything has a magical sense to it - an extra happy, loving touch.

I sincerely hope your Christmas holiday is filled with love and smiles and hugs and warmth. Enjoy your family and your friends and every single minute that passes. Live in the moment and drink in every ounce of joy that this heavenly season provides.

Merry Chrsitmas to all of you!!

Tuesday, December 15, 2009

Grammie's Cheese Logs - A Christmas Tradition

Nadine Townsend - aka Grammie. Although she's passed on now, in our house she comes alive every Christmas season. This once feisty redhead who always seemed to get the last word, left a lasting legacy that I've taken to heart full-tilt....her cheese log recipe. You haven't had the world's best cheese log until you've had Grammie's cheese log. Once you spread it's creaminess on a buttery cracker, you'll be back for more........and more, and more. I started bringing her cheese logs to work (along with other treats) as a way of saying "Merry Christmas" to all of my coworkers - what better way for someone who loves to cook & bake to say Happy Holidays!? I get numerous requests for Grammie's cheese log every year. Now, the Hubs says I should guard Grammie's recipe as if it were gold, but I think it's way more joyous to share a part of her so that people who will never have the pleasure of meeting her - can love her too! And they do - believe me! So...in honor of the one and only Nadine "Grammie" Townsend, I present, Grammies Cheese Logs...Now - I'd made the actual cheese mixture (above) before I decided to share it with the world. But you can trust that in this container is cheddar cheese, cream cheese, mayo, milk, Heinz 57 and liquid smoke. All ingredients were blended in a mixer until creamy - then I chilled it overnight. You don't have to chill it that long - but it firms it up so it's easier to handle and gives lots of time for the flavors to really meld. Before shaping it into a log - you'll want to get your walnuts chopped too - then put them in a rectangle pan that's at least 8 inches long. Oh - and reserve several full walnuts halves for garnish.
Lay two strips of plastic wrap on your work surface and on one of them, using a cookie scoop (I have three sizes and like to use the largest), plop down scoops of cheese mixture along the plastic. You'll want 4 or 5 good-sized scoops worth.
Fold the plastic over the scoops and use your hands to mold the lumps of cheese mixture into a log shape.
Once you've gotten the desired length, open the platsic and, holding the roll just above the chopped nuts pan, literally unroll the log right into the nuts. Give the pan a good-but-gentle shake back and forth to allow the nuts to adhere to the sides of the log.
Use your hands to sprinkle nuts on the top of the log and any other areas that are still bare. Lightly press the nuts so they stick. Once the log is fully covered, carfully pick up the log and press/dip each end into the nuts to coat them as well.
Lay the nut-coated log on the clean piece of plastic. Using the reserved walnut halves, take a knife and dab just a tiny bit of cheese mixture to the back side of the walnut half....
....then press the walnut on top of the cheese log. I like to line about three or four walnuts along the top. You can do more or less...whatever you like.
Voila! Grammie's Cheese Log - completed! Now... this is how I do Grammie's classic cheese log. However, being aware that some poeple may not care for a smokey flavor, I also like to do a variation which excludes the liquid smoke and trades the cheddar cheese for extra sharp. This is very tasty as well and has a nice 'bite' from the twangy extra sharp cheese :-)
Want to make your cheese log a little more personal? This is a mini cheese log! It's only about 2 1/2 inches long and I set a mini log in each flavor aside for a friend who was on vacation the day we had our holiday treats day at work. She'd asked me to save her a few bites and rather than smear a couple of knife-fulls into a container, I thought this'd be way more fun! It occured to me too that this could be a fun way to serve dinner guests....everyone could have their own mini log (even smaller than this) alongside sliced apples and pears and a few crackers. Kind of a special 'between course' nibble or a deviation from a normally sweet dessert!
However you size your cheese log, let me assure you, the actual log does not get any better than this log! Thanks Grammie!!!!!!
Grammie's Cheese Log
Ingredients (makes one 10-inch log or 2 5-inchers):
8 oz. shredded cheddar cheese
8 oz. package softened cream cheese
½ cup mayo
2 T milk
1 ½ - 2 teas. Liquid smoke
2 T Heinz 57
Directions:
Blend all ingredients in mixer until very well combined. Transfer to plastic container and chill for at least on hour to let flavors meld and make it easier to handle. Meanwhile, chop walnuts and place in a shallow rectangle pan (like a 9x13 cake pan). Lay out a long strip of saran wrap and once the mixture is well chilled, ‘plop’ it out down the center of the plastic wrap (I use a big ice cream/cookie scoop to clump down the big blobs of the cheese). Fold the wrap over the cheese and use your hands to shape and roll it into a log shape. Once you have the desired shape/length, open the flaps of plastic and roll the log right into the chopped walnuts. Move the pan back and forth to roll the log into the nuts. Use your hands to turn the log over and to press nuts onto blank spots. Carefully lift log with your hands and press each end in the nuts as well. Carefully transfer log to a fresh piece of plastic wrap. Decorate top of log with full walnuts (use a little leftover cheese mixture as ‘glue’ to attach them to the top of the log). Wrap log in plastic and chill at least another hour before serving (if you HAVE to serve it right after rolling in the nuts, you could – chilling it just makes it a bit more firm after having handled it).

Monday, December 14, 2009

Peppermint Melt-Aways...lighter than air.....

I came acorss this recipe a month or so ago.... As soon as I saw the word Melt-Away, I knew I'd be making these for a Christmas season treat. This cokie is light & airy yet has a creamy nouth-feel. The hint of peppermint wafts over your tongue just to tickle your senses. They are a new favorite and a definite keeper.
These delicate little balls are a cinch to make. I double the recipe...something told me it'd be worth it (turns out I was right....I am like, super smart). I made the cookies one day and frosted them the next.
The frosting itself is also, likght, creamy and hints of peppermint. And most noticeabl;e to me...the frosting is snow white - perfect for a Christmas cookie! For garnish, crush up about 5 small candy canes - there are about 8 or so in that bowl....had lots left over....
Because I thought some poeple might be turned of by the crushed candy canes on top (hard on their teeth or what-have-you), I left some cookies just plain fosted. They were so cute, small adn snowy!
I topped about 2/3 of the cookies with the candy cane - I liked those best. Plus, they just look more Chirstmassy....no mistake that these are peppermint cookies~
I served the cooies on a frosty-looking silver charger. Come and get'em!
Trust me when I say these are a mouth-watering, sincerely melt-in-your-mouth, pastry-like cookie. You will fly to heaven with the first bite.
Peppermint Meltaway Cookies
Ingredients:
1 cup butter, softened
1/2 cup confectioners' sugar
scant 1/2 teaspoon peppermint extract
1-1/4 cups all-purpose flour
1/2 cup cornstarch
Frosting:
2 tablespoons butter, softened
1-1/2 cups confectioners' sugar
2 tablespoons milk
1/4 teaspoon peppermint extract
1/4 cup crushed peppermint candies
Directions:
In a small bowl, cream butter and confectioners' sugar until light and fluffy. Beat in extract. Combine flour and cornstarch; gradually add to creamed mixture and mix well.
Shape into 1-in. balls - I repeatedly dusted my hands with cornstarch as the dough was a bit sticky. Place 2 in. apart on ungreased baking sheets. Bake at 350° for 10-12 minutes or until bottoms are just beinging to brown (to me, the prettiest cookies had no ring of golden brown). Remove to wire racks to cool completely.
Frosting - In a small bowl, beat butter until fluffy. Add the confectioners’ sugar, milk, extract and food coloring if desired; beat until smooth. Spread over cooled cookies; sprinkle with crushed candies. Store in an airtight container

Tuesday, December 1, 2009

Brand New Leftover Stuffing....

What's better than fresh-made stuffing on Thanksgiving day? Crispy, fried stuffing the next day! I made the stuffing for this year's feast. We had fewer people than normal and let's face it, I didn't think two bags of stuffing bread cubes (I'd bought three) would make so much! A good amount of stuffing went home with family in plastic containers, and there was still some left to bring home for ourselves. I didn't want to simply reheat the stuffing, but wanted to make it seem new and different for a whole new dinner.
While heating about 2 tablespoons olive oil along with 1 tablespoon butter in a large, non-stick frying pan, I put aproximately 2 to 3 cups of leftover stuffing in a mixing bowl, added one egg and mixed it by hand to combine it well. I then formed a medium, palm-sized ball into a patty shape (about 3 inches diameter) and gently pressed each side in regular-joe bread crumbs (woulda loved to use panko...but I was out). I then fried each side over medium heat until golden brown...about 3 to 4 minutes per side.
The insides were creamy and full of clasic stuffing flavor while the outsides had just the right amount of crunchy crust to contrast the inner, hot, fluffiness. These were awesome with a hot veg and small steak but I gotta say I think they'd be awesome with a fried egg on top for breakfast! Have to try that next time!

Wednesday, November 25, 2009

Happy Thanksgiving 2009!

Wow, what a fast year this has been! I appreciate the quickness if only because it's been a pretty tough, lean year. Money's been tight & work has been slow so I'm looking forward to a new year with a brighter future for everyone.

Bleaker times aside, I'm as thankful as ever. As long as I have my family, good health for all of us, the home that we love and my pupper Maisy, what elese could I need? Well...food - but in all honesty, I could use less ;-)

I wish anyone and everyone who reads this blog nothing but happiness and full tummies tomorrow! Have a wonderful Thanksgiving!

Wednesday, November 18, 2009

TP & PT @ TG!

What do toilet paper and paper towel rolls have to do with Thanksgiving? Everything when you can create an entire Pilgrim Population out of them!
I mean – is this just one of the cutest little guy ever?! You can make him for yourself with the empty rolls, some construction paper, a black felt tip pen and some glue! I have to admit, my daughter and I made these years ago – but they are sturdy and store easily for use year after year. I don’t have patterns for you, but just eye-balling these is pattern enough really… I don’t remember where I originally saw this fun project…in a magazine? Online somewhere? Wherever it was, my daughter and I were able to easily create our own little village of people!
The turkeys are made with small pinecones and a few of those sponge/foam sheets from your local arts-n-crafts store. It’s good to have a hot glue gun for the turkeys too.
I know times are tight – so if you don’t have the meant to get the materials for the turkeys (you might already have everything on hand...I did!), the smiling Pilgrims and Indians will bring smile to your diner’s faces all the same.

And…..
You can even make napkin rings!
I adore these and they are So perfect on my Thanksgiving table!
This is the perfect weekend arts-n-crafts project for the whole family – and you’ll have a super fun, homemade centerpiece for Thanksgiving come Thursday!

Like I said, I don’t have exact patterns for you but here are directions from my head. Please…don’t over-think any of this. It’s an easy project and there’s no exact way they have to look – just have fun with it!

Materials for Pilgrims/Indians
6 empty toilet paper rolls (to make 2 Indians, 2 girl and 2 boy Pilgrims)
Construction paper – various colors:
light pink or flesh/tan (for skin)
black & white (for Pilgrim clothing & hair)
yellow, orange & brown (for Indian clothing & hair)
Black, fine tip, felt tip pen
Pink felt tip pen
All-purpose glue

Cut a 1 ½ inch wide strip of paper long enough to wrap around the TP tube for the character’s face and glue it in place (tip, I cut all the pieces – faces, clothing, aprons etc. - out first then glue everything on assembly line style). The piece used for the clothing obviously needs to be big enough to cover from the bottom of the face to the end of the tube and needs to wrap around the tube as well. The black on the Pilgrim can be left plain as you’ll glue a ‘bib’ on each and an apron on the girls. On the Indian’s clothing, use the black felt pen to draw on a beaded necklace. For the apron on the girl Pilgrim, you more or less cut a half circle and give it a scalloped edge for decoration - make it join in the back. Cut an oval, then cut the oval in half for the ‘bib’ part of the Pilgrim outfit. Draw little black buttons on with the felt pen. Also draw on the facial features – you can be detailed or simple like the ones shown above. For rosey cheeks, color the tip of your finger with a pink felt tip pen and lightly blot your finger on each cheek. For the hair on the girls and Indians, cut a rectangle 2 ½ inches long and wide enough to span from one side of their face to the other – make vertical cuts for the ‘strands’. The boy Pilgrim should have bangs and shorter hair – so cut a 2 inch long strip that wraps around the tube, then cut out a section for bangs so his face will show, then make the vertical cuts for the ‘strands’. Lastly, headgear… For the Indians, cut one or two small feather shapes and glue in place. Then, cut a ½ inch strip that will wrap around the tube. Before gluing in place, use the black pen to draw a zigzag decoration. For the girl pilgrim, cut a rectangle 4x3 inches and fold a ¼ inch ‘cuff’ along the 4” side. Bend the shape into a cone by overlapping & gluing the two 4” corners opposite the cuff side. Let dry. When dry, squeeze a thin line of glue along the top rim of the girls ‘head’ and place her hat on her head, gently pressing. Let dry. For the boys hat, cut a 2 ½ inch tall strip long enough to wrap around the tube. Glue in place. The trickiest part is brim… Draw the circumference of the tube onto the black paper. Draw a smaller circle about an 1/8 of an inch inside that circle and a second circle ½ outside of it. Cut out using the outside circle as your guide, then cut out the middle using the inner most circle as your guide. Then, every 1/8 inch or so, make tiny snips from the inner circle to the original circumference circle line. Bend all the snipped ‘tabs’ up in the same direction and slide onto the Pilgrim boy tube, stopping where his face begins. Bend out each tab and put a tiny dot of glue on each, then press the tab in, attaching it to the form of the hat. Decorate the hat with a white strip and yellow buckle. Let dry.

For the napkin rings, cut 6 to 7 equal size rings from two, empty, paper towel rolls. Cover each ring with a strip of paper - make them all the same or use all different fall colors! Cut out fall leaf shapes by hand or use a small cookie cutter as a pattern. Cut out one acorn shape for each ring from brown paper, then draw the top of each acorn with a black felt pen. Glue two leaves on to each ring (make sure the leaf colors are different fro the ring!) then glue on an acorn to each ring as well. Let dry.


Materials for turkeys:
One pine cone for each turkey
Hot glue gun and slue sticks
Sponge craft sheets – red, yellow, green, orange, white & brown
Black felt tip pen

Cut five ‘feathers’ for each turkey – one from each color. Cut two white eyes per turkey as well as one wattle (that hangy red thing), one yellow beak and one head. When cutting the head shape, make it approx 3 inches long with a rounded head shape at one end and a tapered straight edge at the other end. Glue on the eyes, wattle and beak – draw pupils on the eyes. Set each pinecone on its side on your work so it sits still and sturdy. Once level and sturdy you now know what will be the bottom and top of your turkey. Using the hot glue gun, pipe a blob of glue near the front of the pinecone, down inside the ‘shingles’ and push the tapered end of the head shape into the glue and hold till set. Pipe blobs of glue toward the back of the pinecone, again down inside the ‘shingles’ and stick a ‘feather’ into the glue and hold till set. Follow by more glue and another color fo feather, slightly overlapping the first feather and repeat until all five feathers have been attached (you might want to stick the feathers in the pinecone to dry set them before gluing them). Let dry.

Have fun!