Showing posts with label fall. Show all posts

Tuesday, December 14, 2010

Melty, Cheesy, Beefy, Juicy, Crispy Patty Melt

Hello, delicious patty-melt-on-sour-dough-because-I-don’t-like-rye….you are beautiful ;-)

Why no….I have no idea why my ass is currently 3 feet wide….do you?

Who doesn’t love a hot, melty, stringy, cheesy, crispy, grilled……..anything?! I didn’t grow up a fan of the patty melt – I hate rye bread. But at this stage of the game of life, I should consider myself lucky that I didn’t thank about swapping breads long ago- ‘cuz my caboose would be even bigger!

I don’t think y’all need to be told how make a patty melt – after all it’s just a patty of juicy ground beef (fyi, press it thin and make it a good inch all-around bigger than the bread if your meat is 80/20); lip-smackingly caramelized, grilled onions; Swiss cheese, 1,000 Island dressing and good bread. Yes, yes…..traditionally rye, but in this case – it as sour dough….about ¾ inch thick sour dough. The loaf was heavy, but we could tell the bread was ‘airy’ which told me ‘this will get totally crispy on the grill!’ (as opposed to a more dense bread that could get soggy on the inner sides).

What makes a patty melt different from a ‘grilled cheese with hamburger in it’? I don’t really know – but I can tell you this: it IS different! I think the trick to this awesome, juicy, cheese-oozing sandwich was time and temp on the griddle. The heat was not too high (you don’t want your sandwich to burn before the inside has gotten sufficiently melty) and not too low (butter on the outside takes so long to melt is hardly gets crisp ands golden…just more yellow). You want a good, medium heat and then, if you have a cast iron press (I used a cast iron bacon press), layh it on top of the sandwich to help concentrate that heat and get the most crispy, uniformly melted, hot sandwich ever!

Yeah, yeah, I know….my bacon press allowed me to create a ‘poor mans panini press’. If you have an actual panini maker, I’m sure this post will sound rather like a grandparent telling you how to crank up the old Victrola – but I beg you…indulge me.

Thanks much ;-)

You know…if you were making three or four sandwiches on a griddle, I imagine you could press the tips down with a bog ol’ cast iron pan and do all four at once! Who needs Oprah’s favorite Breville Panini Makes (at $119) when you can slap a pan on yer sammich?!

Anyhoo – on one of these cold days, treat yourself to a toasty hot, cheesy, dreamy, juicy patty melt – pick your own bread………….you know I will :-)

Monday, November 22, 2010

Happy Thanksgiving!

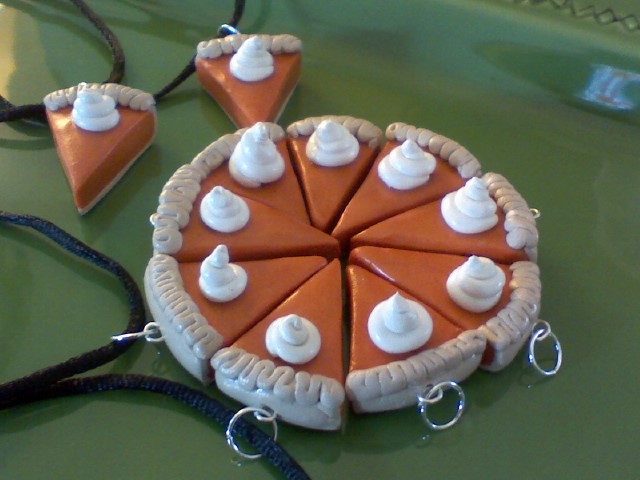
In my own humble opinion, this pumpkin pie looks good enough to eat – but you might notice the hardware that’d make it a tad hard to swallow! That’s because this isn’t real pumpkin pie….they are charms made of polymer clay!

Thanksgiving is my favorite holiday - anyone who calls my house on TG gets a turkey greeting (I have a mean gobble, thank you very much)!

Anyhoo - I made a bunch of these for some of the ladies in my life that I not only adore, but get to see at Thanksgiving time. I love working with polymer clay – and being the food addict that I am, my favorite thing to make with the clay is…food ;-)

I made the tiny pies then made wire loops and inserted them into the back crust. Once they were baked, I attached a ring and strung the charms onto black cord necklaces.

Because I didn’t want the recipients to wear the necklace only a few days, I also made Christmas charms - not all food…

....and let each wonderful woman...
...pick the one they wanted most.

This first batch of charms were given this past weekend……then I went home and went kinda charm nutty and made……

…all of these! Somehow my hands worked liked the wind and I busted all of them out in a couple of hours.

I’m not sure which one is my fave…the hubs likes the presents the best. I really like the ‘Christmas Pudding’ though and the poinsettia ;-) I think my big sis will snag one of the Christmas Lights charms but what anyone else will pick is…well…anyone’s guess!

I had all the stuff on hand to make all of these charms, but should you choose to do some yourself, it doesn’t have to cost you an arm and a leg. Watch for coupons to your local Michael’s, Joann’s or other craft store and you can save big!

With that I’ll wish you a very Happy Thanksgiving ;-) Here’s hoping you don’t get too full and that you make warm family memories to take you into this joyous holiday season!

By the way - to all my family and friends...I love all of you! I am so lucky to have you in my life. All of you are what I'm thankful for every day of the year.

Tuesday, November 16, 2010

World's Best, Loaded, Baked Potato Soup!

I went to Heaven twice this past weekend. The first time was when my sister and I made this most delicious, loaded, baked potato soup. The second time - was when I made the soup again the next day! I'd sent a bunch home with my big sis since we'd cooked it up together - it's so much more fun to share the wealth ;-) But by the time my husband put clams and a handful of bay shrimp in his half of what was left, and my daughter and I had a bowl each - it was gone! And I have to tell you....this soup is SO freaking amazing I had no choice but to make it again.
Not only is this soup PERFECT when made to the letter of the recipe below - but I believe it could very well be the grand base for a million other soups (*note- the original recipe calls for whole milk - the first go-'round we used 2% as I never buy whole milk and it was PLENTY thick. Round two, I used skim as that's what I always buy and it was a thick and velvety as the first batch - trust me). I'd first halve the amount of potatoes in it and I'd probably dice them whereas in the original recipe, you simply put the scooped out chunks tater of any size right into the pot. Depending on what other ingredients I'd add, I also might use my immersion blender to make the soup silky smooth with tates rather than chunky at all. BUT...think of the varieties of soups you could make just by tossing in your favorite ingredients! Like I said, the hubs threw in a can of clams and a small handful of bay shrimp to create Slumgullion - but what I wanna try is a bag of frozen super sweet corn and a can or two of green chilies! But what about leftover ham, or sweet or spicy sausage? Maybe roasted garlic cloves or roasted peppers and onions - Holy Moly the list is endless...ENDLESS I'M TELLING YOU! Besides the fact that I adore this soup 'as is', it may be my my newest fave recipe only because it's SO versatile and I can make it the way I want it when the moods strikes me..whatever my mood might be! If I've ever wanted you to try ANYthing on this site before...this is THE one thing I beg you to cook up. It's super easy, really fast and insanely good!

Loaded Baked Potato Soup

Ingredients:
9 baking potatoes
2/3 cup butter
2/3 cup all-purpose flour
6 cups skim milk (can use 2% or whole as well)
1/2 tablespoon salt
1 teaspoon ground black pepper
1/2 cup bacon bits
4 green onions, chopped
10 ounces shredded Cheddar cheese
1, (8 ounce) container sour cream

Directions:
Prick potatoes with a fork and cook in the microwave until soft baked (you can do this step ahead of time if you choose). Scoop out the baked potato flesh into bowl. In a large saucepan over medium heat, melt butter. Whisk in flour and cook for about 2 minutes, stirring constantly till mixture bubbles, then cook a minute more to dispel a flat 'flour taste'. Whisk in milk, a little at a time, stirring constantly (will be very thick when first few additions of milk are whisked in - just keep whisking and adding in all milk). Stir until this mixture begins to thicken - about 5 minutes. Add in potatoes, salt, pepper, bacon bits, green onions and the cheese. Stir to incorporate. Add in sour cream and heat through. Serve topped with additional bacon, onions and cheese if desired.

Thursday, October 7, 2010

I Scream, You Scream, We All Scream For......Scones!

OMG….this is my new favorite scone – orange-cranberry. The flavor of these scones is so incredible….delightfully orange, but not over-powering and the slight tartness/chewiness of the cranberries….OMG…just let me say, Yum!
These orange-cranberry scones are SO DAMN GOOD and truly look and taste like they came from a first class bakery. I originally got the recipe from a poster on the Tasty Kitchen blog site (Godchild of The Pioneer Woman blog). The only change I made was to totally cover the top of the scones with large-granule decorating sugar. I mean encrusted them! I adore a crunchy, sweet top on a scone plus...it’s makes them so pretty! They actually sparkle!
I made these scones for the first time for Father’s Day this past June. But because the hubs isn’t 100% a ‘sweets’ kinda guy, I also made these….
Bacon-Cheddar-Onion Scones!

These were also super good…and especially nice with coffee if you happen to drink your java kinda sweet (I use ½ packet of Spenda and a little fat free hazelnut creamer). I’ve come to find that I’m not a huge fan of the ‘sweet food/sweet coffee combo’. I once had a pumpkin scone with a pumpkin latte from Starbucks and afterward I thought I’d die – like, for reals! Anyway….
This recipe originally came from Ina Garten – her Cheddar Dill scones. But I changed it up by omitting the dill (I like dill, but wasn’t nuts about it being in a breakfast scone) and adding cooked, chopped bacon and sliced green onions. These were savory and bacony – really good. But where I could eat one after another of the orange-cranberry (not that I did!)…these scones…no way. They’re more like a little meal in one flaky – yet slightly heavy and very filling – triangle. Eating two of these would be like eating two omelets – and that’d be crazy! ;-)

Both of these scones are super easy to make. And they’re so warm and homey…they’re perfect for a cozy, fall, weekend morning. Store leftovers in an airtight container or freezer-type bag so you can eat them throughout the week or take one to work each day for your morning break! They are Deeeeee-licious!

Orange-Cranberry Scones

Ingredients:
2 cups All-purpose Flour
7 teaspoons Granulated Sugar
2 teaspoons Baking Powder
½ teaspoons Salt
⅓ teaspoons Baking Soda
1 Tablespoon Grated Orange Peel
⅓ cups Cold Butter
1 cup Dried Cranberries
¼ cups Orange Juice
¼ cup Half-and-Half Cream
1 whole Egg
1 Tablespoon Milk
¼ cup large-granule, decorator sugar
Glaze:
½ cup Powdered Sugar
1 Tablespoon Orange Juice

Directions:
Sift together flour, 7 teaspoons sugar, baking powder, salt and baking soda. Stir in grated orange peel. Cut in butter until mixture resembles course crumbs; set aside. In a small bowl, combine dried cranberries, orange juice, cream and egg. Add to the flour mixture and stir until a soft dough forms. On a floured surface, gently knead 6-8 times. Pat dough into an 8-inch circle. Cut into 10 wedges. Separate wedges and place on an ungreased baking sheet. Brush with milk; sprinkle with decorator sugar. Bake at 400 degrees for 12-15 minutes or until lightly browned.
Glaze:
Combine powdered sugar with 1 tablespoon orange juice. Brush glaze over scones and give one more dousing of decorator sugar if desired.


Bacon-Cheddar-Onion Scones

Ingredients:
4 cups plus 1 tablespoon all-purpose flour, divided
2 tablespoons baking powder
2 teaspoons salt
3/4 pound cold unsalted butter, diced
4 extra-large eggs, beaten lightly
1 cup cold heavy cream
1/2 pound extra-sharp cheddar cheese, grated
6 - 8 slices cooked, chopped bacon
1/3 cup sliced green onions
1 egg beaten with 1 tablespoon water or milk, for egg wash

Directions:
Preheat the oven to 400 degrees F.
Combine 4 cups of flour, the baking powder, and salt in a large mixing bowl. Add the butter and, using a pastry blender or two forks, incorporate butter into flour mixture until butter is the size of small peas. Mix the eggs and heavy cream and quickly add them to the flour-and-butter mixture. Combine until just blended. Toss together the cheddar, bacon and onions, and 1 tablespoon of flour and add them to the dough.. Mix until they are just incorporated. Do not over mix.
Dump the dough onto a well-floured surface and knead it for 1 minute, until the cheese, bacon and onion are well distributed. Roll or pat the dough into a 3/4-inch thick disc. Cut into 6 or 8 ‘pie-wedge’ triangles. Brush the tops with egg wash. Bake on a baking sheet lined with parchment paper for 20 to 25 minutes, until the outside is crusty and the inside is fully baked.

Tuesday, November 3, 2009

Pumpkin it up!

With it being the onset of 'eating season', my household wants to try to enjoy the flavors of the holidays without all the fat. My daughter and I made the pumpkin muffins shown above, just last night. They were sweet - but not too - moist, filling and....low fat! At 155 calories per muffin (the recipe makes 9), they have 4 grams of fat but also 4 grams of fiber (and they 3 points each for those of you who count) - that's dang good...and so was the taste!
Paired with a cup of coffee and a banana this morning, one muffin made a great breakfast that was a welcome change from cold bran cereal.
Try these terrific muffins and soon you'll be enjoying the flavor of the season without all the guilt!
Pumpkin Oat Bran Muffins
Ingredients:
1 1/2 cups oat bran
1/2 cup all-purpose flour
1/2 cup packed brown sugar
2 teaspoons baking powder
1 teaspoon pumpkin pie spice
1/2 teaspoon salt
2 egg whites
1 cup canned pumpkin
1/2 cup fat-free milk
2 tablespoons canola oil
Directions:
In a small bowl, combine the first six ingredients. In another bowl, whisk the egg whites, pumpkin, milk and oil until well blended. Stir into dry ingredients just until moistened. Coat muffin cups with cooking spray; fill half full. Bake at 400° for 20-25 minutes or until a toothpick comes out clean. Cool for 5 minutes before removing from pan to a wire rack.

Monday, October 12, 2009

Time Flies - Fall is Here Again...

This post marks just about one year since I started this blog. I needed a place to be creative and get out what was on the inside and it’s been super fun to do so. My first blog included instructions to make this wreath that, as of Saturday, is gracing our door yet again.
My daughter and I put out a few other autumn decorations….yummy candles and pine cones – and some squishy window stickies I’d bought last year on clearance. The house felt warm and cozy and perfect for baking – so that’s what we did! It’s not too often that I get a chance to spend an entire day with my 15 year old daughter what with friends and home work taking up her time – but yesterday, that’s just what I got…the whole day. It was heaven!
These are the cookies we made – Halloween Sandwich Cookies. They were sinfully simple and super scrumptious.

The recipe for the cookies is just three ingredients:
1 cake mix of your choice
1 stick of butter softened
2 eggs

Mix all ingredients together. It’ll be stiff and you’ll think it’ll never come together – but it will. Use your stand mixer to save time and trouble. We actually made two batches at once (2 mixes, 2 butters and 4 eggs).

Once dough comes together, use a small scoop to make even-sized balls on parchment-lined baking sheets. You could roll walnut-sized balls if you don’t have a small scoop.
Bake for 11 minutes at 350-degrees and cool completely. It doesn't take long at all.
Next, whip up some creamy vanilla frosting. You probably have a favorite recipe – I just sued my basic Betty Crocker that included powdered sugar, vanilla milk and butter. Then we split the icing into thirds and tinted them with….
Green…..
…then sandwiched them together….
…and orange….
…and sandwiched….
…and purple….
….and, well, you get the idea! Aren’t Halloween colors so much more fun with the addition of the green and purple to the age--old orange and black?! We LOVE it!
My Minners did a great job filling all the cookies. And buy making a double batch of dough, we had enough to set some aside to make some of her favorites…..
Chocolate with white chocolate chips! She and I both like white chocolate way better than bittersweet for baking.
But these were what the day was about – don’t they look fun and festive?
Mmmmmmm…..Chocolaty and creamy…. You can use any flavor of cake mix and icing to make these super easy sandwich cookies any time of year! Spice with cream cheese for Thanksgiving, lemon or strawberry cake mix with tinted icing for spring or Easter….the possibilities are endless. They are quick, delicious and great baking fun for kids of all ages.
And….individually bagged and tied with a ribbon – they make fun treats for friends, coworkers and family!

Welcome Fall!!

Tuesday, November 4, 2008

Mmmm....what smells so good?!


Ahhhhh....I got my house back. Halloween is fun and all - but I SO entirely love the day that all those witch figurines, paper skeletons and pumpkin candy dishes take solace in their tissue paper tombs and get stored away in their boxes till next year.
With fall being my favorite season, I like nothing better than to gather the pine cones and rocks and other natural elements I've collected over the years (my sister gave me some monster pinecones a couple of years ago that I adore!) and place them with candles and other items that help our house feel warm, cozy and dressed for the season. With all the candles aglow, I feel extra secure, safe and appreciative of the home we've made for our little family.
This kind of decor is totally 'me' and gets me in the mood for baking treats and cooking yummy dishes. One thing my daughter and I really love is simmering a pot of wonderful, seasonal scents on the stove. Just fill a small saucepan with water and add cloves, cinnamon (sticks or ground - whichever you have on hand), ginger and *orange peel (scrape off the white pithy part, then score the outside of the skin to really release the fresh orange scent). Bring the pot to a boil on your stove top, then set the pan's lid askew atop the pan to allow the sweet vapors to escape. Turn the heat to a very low simmer - soon, your house will be filled with a wonderful 'cider' smell and the aroma of fall and Thanksgiving. It's heaven! Warning...check the pot every so often and replace the water that has evaporated with hot tap water. You won't need to reboil the water as it will soon simmer once again on it's own.
*Each time you eat an orange or satsuma this season, save your peels in a plastic sandwich baggie in the fridge - that way you'll always have peels on hand for yourt simmer pot!
There's nothing better for making your home warm and cozy - give this a try soon!

Thursday, October 2, 2008

Pumpkin Pie Dip...or is that Scoop?!

My sister and I agree that when a dip is really good, you can't just dip it....you gotta scoop it! Okay - so, I had a few friends over last weekend for an autumn get-together. As is usual for me, I began planning the menu a couple of weeks in advance because I like to make lists for shopping and prepping ease - and becasue I just get excited to entertain! One day, while browsing the food magazines in Borders, I came across this terrific appetizer that was just perfect for fall - Pumpkin Pie Dip - Yum! Once October starts, I could have pumpkin in just about every single thing I eat - I love it! Anyway - like a true tight-wad in this economy, I pulled a scrap of paper and a pen from my purse and scribbled down the thankfully short recipe rather than purchasing the whole magazine. I guess that's sort of like stealing - but hey, the pumpkin pie dip was really the only great recipe in the whole mag - so, better I 'steal' one, tiny, little recipe than the publisher scamming me out of 6 bucks for a whole bunch of other useless recipes, right?! Riiiight.... ;-) Anyway - this dip is super-scrumptous and so easy. 'They' say to serve it with gingersnaps - which I did, but I also baked some cinnamon/sugar pie crust cut-outs that to me, were more delicious with this dip than the snaps. Why not whip up this yummy treat and decide for yourself?!

Pumpkin Pie Dip ~
8 oz. softened cream cheese
2 cups powdered sugar
1 cup canned pumpkin
1/2 cup sour cream
1 teas. cinnamon
1 teas. pumpkin pie spice
1/2 teas. ground ginger
Stir all ingredients together until well combined. Chill if desired or serve immediately with gingersnaps and/or pie crust cut-outs (see below)
Pie Crust Cut-Outs ~
Make your own pie dough and roll it out to 1/8" thickness or purchase ready-made dough rounds. Use mini cookie cutters to cut out fun shapes or simply cut the rolled-out dough into small, equal size squares. Place shapes on a baking sheet and lightly brush the top of each cut-out with milk. Sprinkle each one with a cinnamon/sugar mixture (go heavy or light on the sprinkling, it's up to you). Bake for approx. 8 to 10 minutes at 350-degrees. Check them every minute after minute-8 to make sure they don't get too brown - the edges should be just lightly browned. Slide cut-outs off the hot baking sheet onto a cooling rack. Once cool - store them in an air-tight container - that is, IF you don't eat them all up right away with the dip!

Wednesday, October 1, 2008

Welcome October!


My daughter and I recently had an arts-n-crafts day and this is the result of our efforts! A 'fall-y' wreath with cute, little ghosts tucked in here and there. It was easy to make and pretty inexpensive (using a coupon for our local fabric store). It totaled about 11 bucks for everything from the wreath, the leaves and the tootsie pops inside each ghost. We made a wreath last year too but used a few different fall/halloween fabrics to cover the ghosts - however, the non-white ghosts blended in so much with the leaves, they were almost invisible...so this year, we stuck with traditional white. The wreath is super welcoming each time we come through the front door - and knowing we made it ourselves makes it even better! If you should make one yourself, be sure to wrap the tootsie rolls inside the ghosts, in plastic wrap before covering them with fabric. We didn't do this last year and over time, in storage, the tootsies 'weeped' and bled through the fabric. So, although it was super fun making a new wreath this year...the goopy, stained ghosts from last year were the real reason behind our new creation :-). Wanna make a fun wreath like this? Here's how!
Supplies:
1 grape vine wreath
1 wreath door hanger
2 to 3 kinds of silk leaves (to include berries, small pumpkins etc.)
5 to 6 Tootsie Pops
Plastic wrap and tape
1 black felt tip marker
5 to 6, 7x7" squares of fabric of your choice
4 pipe cleaners, cut in half (best if they match the color of your fabric)
Hot glue gun and glue sticks
Hang the bare wreath from your wreath hanger - turning it this way and that until it hangs most pleasingly to your eye. Leaving the hanger in place, lay the wreath/hanger onto your work surface (this way, you know always know where the top of your wreath is which is good to know when placing the leaves and ghosts etc.). Cut the leaves, berries, pumpkins from their plastic 'vines' and set aside. Wrap tops of tootsies in pastic wrap and secure with tape around the pop stick. Cover each tootsie with a fabric square, gathering the fabric at the base of the pop and securing with 1/2 length of the pipe cleaner. Draw eyes on each ghost with the black felt marker. Place/stick tootsie ghosts into the wreath - space them any way you want - it's your wreath! Next, place the leaves into the wreath the way that pleases your eye - and lastly, place the berries and pumkins here and there for accent. Once everything is where you want it, start at one point and begin hot gluing each piece in place until all pieces have been secured all the way around the wreath. Lift the wreath by the it's hanger and make sure all pieces are in place and nothing is loose. If all is good, your wreath is ready to hang!
Enjoy walking through your own front door the whole fall season!