Tuesday, August 24, 2010

Meringue Shell Crowns and Lemon Curd Recipes!

So – if you get the itch to make the meringue shells pictured yesterday – here’s all you have to do – super easy!

6 Individual Meringue Shell Crowns

Ingredients:
3 large room temp egg whites
1/8 teaspoon cream of tartar
¾ cup sugar
½ teaspoon vanilla extract

Directions:
Preheat oven to 275-degrees and line a baking sheet with either parchment paper or a silpat. Dust the surface with a little corn starch.

Begin beating egg whites until frothy then add cream of tartar and continue beating on high speed. Begin adding sugar by the tablespoon full allowing mixture to beat well between each addition until all sugar is added. Pour in vanilla extract and continue to beat until stiff peaks form. When whites appear to be stiff, stop mixer and feel a pinch of the mixture between your thumb and forefinger. If it’s still a little grainy, continue beating until whites are smooth. All that sugar need to be completely dissolved. Once whites are no longer grainy – it’s ready to pipe.

Load the egg whites into a pastry/piping bag fitted with a large star tip. Pipe crowns by piping swirled circles (begin in the center of the circle and swirl around itself working its way outward) to form a 4 to 5 inch circle. Pipe 6 crown/circle bases this way, then come back to each and pipe stars atop the outer edge of each. When done, place tray in oven and bake for 45 minutes. When timer goes off, turn the oven off and open the door, leaving it ajar for an additional 45 minutes allowing the crowns to cool completely and slowly in inside the oven. You may then move them to an airtight container or rack to set until ready to fill. See? EASY!

Ina Garten’s Lemon Curd
(this is Ina’s recipe but my own comments are noted with a * *)

Ingredients:
3 lemons
1 1/2 cups sugar
1/4 pound unsalted butter, room temperature 4 extra-large eggs
1/2 cup lemon juice (3 to 4 lemons)
1/8 teaspoon kosher salt

Directions:
Using a carrot peeler, remove the zest of 3 lemons, being careful to avoid the white pith. Put the zest in a food processor fitted with the steel blade. Add the sugar and pulse until the zest is very finely minced into the sugar. * * I used a microplane to zest my lemon, creating very fine shards of lemon peel – but I still combined the zest with the sugar in the food processor to blend it together well.
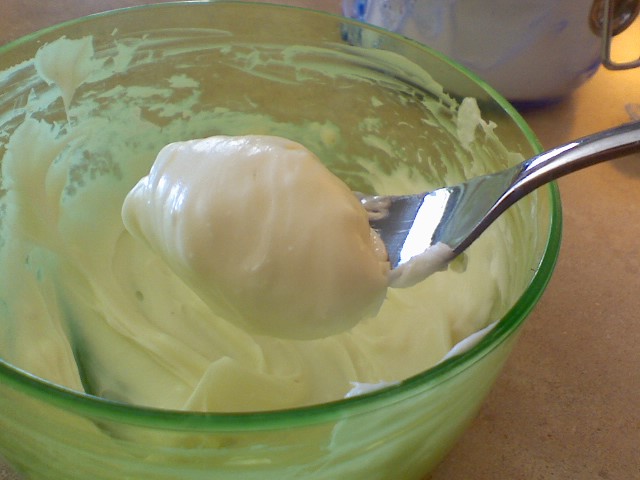
Cream the butter and beat in the sugar and lemon mixture. Add the eggs, 1 at a time, and then add the lemon juice and salt. Mix until combined. (* * will be voluminous and light ‘whipped butter yellow’)
Pour the mixture into a 2 quart saucepan and cook over low heat until thickened (about 10 minutes), stirring constantly (* * It’ll take WAY longer than 10 minutes if you do this on low. I have my temp at a notch and a half below medium and stir the entire time – it takes a good 15 minutes or so. The mixture will go from that ‘creamy whipped butter appearance to a silky, more liquid form to finally a thicker form, say close to a pancake batter…never will it be like a super thick gel). The lemon curd will thicken at about 170 degrees F, or just below simmer. Remove from the heat and cool or refrigerate. Use as desired…..as in…EAT IT WITH A SPOON!!!!! YUM!!!!!

Monday, August 23, 2010

Meringue Shells with Lemon Curd

Hi! Nice to see you again! No – I didn’t get my phone fixed but I realized that all this time I coulda been borrowing my daughter’s phone to snap my pics! Yes, I would’ve had to endure the ‘eye rolling’ that comes along with asking “Okay, Min...I need your phone again” – but hey, at age 16, what doesn’t included eye rolling, eh?

So….I made a really fun dessert this past weekend – Meringues with lemon curd (my fave!) and fresh whipped cream and strawberries. I wish I’d have thought to take pics al the way through – but the idea didn’t come to me until these little beauties came out of the oven. Besides…my daughter might have had to miss/wait for the 300 missed calls during that time – for shame!

Anyhoo, I made a simple meringue (recipe to come tomorrow as I don’t have it in my head and I wnana make it exact, of course), and whipped the room-temperature egg whites and everything together until I had absolute stiff, snow white peaks, then put it all in a pastry bag with a big star tip and piped out individual meringues that once done, just begged to be filled with sweet scrumptiousness!Check it out…
Doesn’t that just look like a lovely, delicate yet delectable crown?! These fully baked and cooled meringues look exactly the way they did when they went into the oven –‘cept slightly off-white rather than snow. They baked for 45 minutes at 275-degrees then cooled in the oven – door ajar – for another 45. Truth be told, I thought the length of time was a it much for the temp. I might try 250 next time….and maybe 5 minutes less – just because it’d be so pretty to have these shells remain pure white.

Okay – so…I’d piped, baked and cooled – and while all this was happening, I made the filling. Lemon curd! OMG I love it so! I could live off it – it’s just that damn good. I follow Ina’s Garten’s recipe and it comes out ‘perfection each time’ (again, recipe tomorrow…promise. I just HAD to post without it today ‘cuz it’d just been too long!). I let the lemon curd chill out in the fridge for a few hours to thicken up a but more, but once I was ready to assemble….here’s what I did….
I put a couple of heaping tablespoons – maybe even 3..I said I loved it remember?! – in each meringue shell….
Then topped that with freshly whipped cream – sorry Cool Whip – you got kicked to the curb on this recipe!

Then…..I made sorta the wrong decision on this next part – but hey…live and learn, eh?
I ladled strawberries in syrup over the top. It was delicious, yes….but not nearly as pretty as it would’ve been had I just spooned on a few fresh slices of berries and maybe kiwi.....just like Mom said! Listen to your mother…at least SOME of the time!

All in all it was a fun undertaking – and really….quite easy. It’s nice to know that an elegant, eye-catching dessert can be made without tons of effort or money….just takes a little time.
Give these a try next time you wanna bump up ‘good ol’ dessert’ into something fancy-schmancy!

Recipes tomorrow!

P.S. – it’s nice to be back and thanks to all who said you missed me – right back at’cha ;-)

Tuesday, July 20, 2010

Out of Commision - for at least a while.....

So - it's been quite a while since my last post. I've made so many fun dishes...Bacon, Chive & Cheddar Scones......Orange Cranberry Scones....Orzo & Goat Cheese Stuffed Tomatoes....Grilled Pizza's (way better than my much earlier grilled pizza post)....Steak Strips in Orzo with Grape Tomatoes and Peppers....Crunchy Baked Zuchinni Sticks....Terriyaki Grilled Chicken with Swiss and Pineapple....Asparagus Pasta Salad....4th of July Cupcakes!

The issue? I take pics for all of these things on my phone (it takes great, auto-zoom pictures), then I email them to my computer and create my blog. Trouble is.....my phone doesn't seem to want to send any pics anywhere! :-( It's even having trouble receiving photos that people send me... I'm majorly sad as I've had lots to share and feel there's a brick wall standing in front of me keeping me from doing so! My phone IS a couple of years old - that could be one of the issues - but an upgrade isn't available to me for quite a while. Long story...I'll spare you the gory deets ;-)

Anyhoo - I'm gonna keep trying and working on it as this IS a fun outlet for me - even if only 4 or 6 or you read this! LOL :-)

Till then - have a great summer and hopefully I can get this up and running again soon!

Monday, June 14, 2010

Fast & Easy Cinna-Minnys

Who doesn’t love a hot, gooey cinnamon roll?! My daughter and her BFF love them. Said BFF spends one night at our house just about every weekend and we really like having her. I know lots of moms/parents let kids fend for themselves as far as breakfast when a sleepover has occurred, but I’ve never felt comfortable with that. As a mom I feel like it’s my job to start their day off nicely with a hot breakfast. Not necessarily a nutritious breakfast, but a hot one that they’ll like ;-) While they enjoy pancakes, waffles, french toast and eggs/browns/bacon, by far they like hot cinnamon rolls the most. My daughter’s nickname is Minny, so, seeing as they’re her favorite, I named the tiny treat after her!. I’ve made real, yeast, homemade cinnamon rolls a few times and they are heaven – but that means having lots of cinnamon rolls around the house for days which is really bad for me! Then, I fell into the habit of buying the Pillsbury ones in the can – these are fine, but they’re far from great. So….a few months ago, not finding a can of the regular cinnamon rolls in the fridge, yet seeing a can of crescent rolls, I was able to make the most melt-in-your-mouth, fast & easy cinnamon rolls that have become the girl’s top choice for breakfast (and a side of bacon never hurts). So, still with a little help from Pillsbury, I present my Fast & Easy Cinna-Minnys! FYI – because I made these up on a whim, measurements are approximate. There is really no way to screw these up though, so check out how I make’m and then have faith in yourself to throw them together :-)
You’ll need 1 tube of Pillsbury Crescent rolls. The kind shown above is the new, one full sheet kind – but you can buy the regular rolls, just unroll them into one big sheet and press them together at the seams. Also gather some brown sugar, cinnamon and butter.
The rolls are pretty buttery tasting already, but begin by spreading a very thin layer of butter on the dough just to help the filling adhere a little better.
You can see the butter is very thin – I bet there’s only about a 1 ½ tablespoons total on there. Also, leave a good half inch unbuttered along one of the long sides to make sealing easier after rolling.
Next comes the filling – Yum! My filling is simply brown sugar and cinnamon. Again, I’ve never measured, but I’m gonna say I use about 1/3 cup (packed) or ½ cup un packed brown sugar and approx 1 ½ tablespoons of good cinnamon. Stir the two ingredients together well, in a bowl, then pour it down the middle of the buttered dough.

Then spread the filling mixture evenly from end to end and to the edge of one, buttered, long side leaving the other, unbuttered long edge free of filling.
Starting at the long side where the filling is right up to the edge, begin rolling the dough – taking care to keep the roll as snug as possible (as opposed to loose and floppy). Then, pinch and seal the dough along the unbuttered edge. Seal it well so the rolls don’t Unroll while baking.
Cut the into individual slices – about ¾ inch thickness. Using a good, serrated knife and a sawing motion makes this a snap.
Place each slice on a baking sheet. I use well-honed stoneware to bake my rolls – if you’re going to use a metal baking sheet, you’d do well to use parchment paper or a silpat as the sugary filling will be a nightmare for you, burning the rolls on the bottom and making cleaning impossible!
Yes these cinnamon rolls are smaller than the ones you pop out of a can, but you get way more and I guarantee, they taste WAY better! Put your filled baking sheet into a preheated 350-degree oven for 12 – 14 minutes. Again, I’ve only ever baked these on my stoneware, so if using a regular backing sheet, please keep eye on them – checking for doneness after ten minutes the first time you make these – then increase baking time by one or two minute intervals until light golden brown.
Mmmmm….baking is done….
Puffy, tender and all cinnamonny in the middle! See the filling that oozed? That’s why you’ll need a silpat or parchment on a metal sheet!
Now….what’s a cinnamon roll without cream cheese icing? It’s not complete – that’s what!
This is super simple…grab a bowl and dump in ¼ brick of cream cheese (nuked to make it soft), 2 or 3 teaspoons of butter, about 3 tablespoons of powdered sugar and a tiny splash of vanilla. Stir it up good with a fork or mini-whisk…..
….until velvety smooth and use an knife or small off-set spatula to smear about a half teaspoon-worth if icing on each hot cinnamon roll.
Eat’m while there hot! Soooo good! I tried to take a picture of one of the little, delicious, cinnamon treasures – but the hot filling was burning my fingers before I could get a picture worth saving! But trust me – these are dreamy, tender & flaky and full of cinnamony-brown sugar & buttery flavor. The twang of the cream cheese icing is the perfect compliment to the deep cinnamon. The best semi-homemade cinnamon rolls :-)

Fast & Easy Cinna-Minnys

Ingredients:
Rolls:
1 can/tube Pillsbury Crescent roll sheet or rolls (seams pressed to form one sheet of dough)
1 ½ tablespoons soft butter
1/3 cup (packed) or ½ cup (unpacked) light brown sugar
1 ½ tablespoons cinnamon

Icing:
¼ brick cream cheese (softened)
2 -3 teaspoons butter (softened)
3 tablespoons powdered sugar
Tiny splash vanilla

Directions:
Preheat oven to 350-degrees. Butter dough sheet leaving ½ inch of one long side of dough butter-free. Stir brown sugar and cinnamon together in a bowl, then pour on top of buttered dough spreading filling evenly over butter but be careful to leave unbuttered strip along that one long side filling-free. Starting at long side where filling meets the edge of the dough, roll up dough jelly-roll style, keeping roll snug and pinch & seal log along the opposite, unbuttered/unfilled long edge. Cut into ½ inch slices and place cut-side down on stoneware or silpat/parchment lined baking sheet. Bake for 12-14 min or until light golden brown. Stir together all icing ingredients and smear the top of each mini-cinnamon roll with approx ½ teaspoon of cream cheese icing. Serve immediately.

Monday, May 3, 2010

Sweet 16 Cake and Super Fun Ice Cream Cups!

Have you ever loved someone so much it just about oozed from your pores? That’s how I feel about my daughter and this past weekend she reached that birthday that when she was a tiny baby, everyone talked about, “Wait till she turns 16!” Well - My one and only baby girl is 16 years old and I love her 16 times more today than I did when she was born – and I was totally nuts about her then!
I wanted to decorate her cake to celebrate her life and the person she’s become. So, after ordering a plain, white frosted ½ sheet cake from Costco (hellooooo…? $16.99 for a cake that will serve not only 22 party guests but leave a few servings of leftovers? Perfect!). I knew I wanted to get her pictures on the cake and assumed I’d have to make the wire curly-cues myself but found these too-perfect Sweet 16 photo holders at Party City where we’d bought a few other ‘16’ party items. Aren’t they just so cute!?
The fun – and hard part – was choosing the 5 pics to put into each holder. We only have about a million photos of her!
She’s always wanted one of those big, chunky ‘number’ candles too…only had to wait 16 years to get one ;-)
And – look what else I made for this super fun party….Ice Cream Cups! Don’t these just scream ‘Birthday Party’?!
They are totally edible, made of semi-sweet chocolate, then the edges were sipped into white chocolate then immediately dipped into hot pink sugar or tiny, colored balls.
I used my littlest scooper to form the ice cream balls, then set each on wax paper in a 9x13 pan and let them harden in the freezer overnight so all I had to do the day of the party was drop a ball in each cup…..
...and top each with a cherry! Now – I will admit…I took this picture in advance because I knew if I waited until party time, I’d totally forget to snap a photo. But what I ended up forgetting at they aprty – was putting on the cherries! :-( Oh well – they were still super cute and really yummy :-)
They tasted like an ice cream bar, ‘cept with more chocolate…never a bad thing! They, along with her very personalized cake helped make my babydoll’s very special birthday a little sweeter.

The ‘sweet’ for me was when she told me it was the best birthday she’d ever had. I love you Min! I'm so gald you had such a Happy Sweet 16!!!

Monday, April 26, 2010

The Best Burger Ever!


OMG – Look at this thing of beauty! We had gilled hamburgers over the weekend and I’m not ashamed to say – we had them twice. They were THAT good! I love that something as simple as a terrific, juicy burger can instantly make everything right with the world – at least till you swallow the last bite!
The hubs and I found these awesome buns in the bakery department of our local market (Fred Meyer – aka Kroger in other parts of the country). They had melted cheddar cheese and sliced jalapenos on them and the very second we saw them we said –“We gotta have burgers on those tonight!” We’d been planning on making a Mexican lasagna, but the very site of these beautiful buns whisked that idea away in an instant!

The buns were soft on the inside and just a slight crust on the outside. The jalapenos gave each bite just a tiny hint of heat and jalapeno flavor. They were – in a word – perfect.

We cooked up a few slices of bacon, sliced some sweet onion and red, ripe tomato and I shredded some lettuce – I LOVE shredded lettuce on a burger WAY more than big ol’ flat lettuce leaves – there’s more crunch!
I put the tomato and onion between the burger patty and bottom bun. All those fresh veggies on top of a slice of melted cheese can get too slippery – not that a messy, drippy burger isn’t terrific, but it’s nice when it can all stay together too – you get every flavor in every bite. I suppose it doesn’t photograph as pretty – but hey, just check out that close-up shot, above!

Mmmm…wish I had one now! Next chance you get - make yourself a great burger - there is nothing better!

Tuesday, April 20, 2010

Roasted Corn Dip

There are few appetizers in my arsenal that are not only my particular favorites but ones my family or friends request again and again as well. This is one of them….roasted corn dip. It’s variation of Emeril Lagasse’s Fire Roasted Corn Dip – but I don’t always fire roast the corn and I changed up a few ingredients too, so I simply call mine – roasted corn dip.

Now, when I was young, corn wasn’t to be on or in anything ‘cept a cob or my mouth! It couldn’t be creamed and it couldn’t touch anything else on my plate. Funny – as an adult I now love corn in just about anything! I will say I pretty much gotta have sweet white corn as opposed to yellow. I love the crisp bite to the little, white kernels...yellow corn seems big and chewy to me!

This dip is creamy and the sweet taste of the corn comes through the gentle spice of the peppers and jalapeno – but it’s the garlic that makes it sing. It’s not a ‘garlicky’ dish at all….but the combination of all thee flavors together with the cheese and the sweet and the heat is just darn near prefect. There’s never any left when I make it for a party. Key to a successful corn dip is in the details….make a nice, fine dice on your veggies. Nothing I dice is any bigger than the kernels of corn into which they’re mixed – most of them are smaller. This allows a prefect marriage of flavors in your mouth rather than a big ol’ chunk of pepper and only three corn kernels. Are you pickin’ up what I’m puttin’ down? I mean…if you’re gonna make something delicious – why not make it as delicious as it can be??
So – we start with veggies – these are the bigs – and you’ll need about ½ of each one shown as well as the name sake ingredient….
…..Super Sweet White Corn! Now like I said, I don’t always fire roast in which case I do use the corn shown above. Come corn season though, I’m all about getting the corn onto the hot grill to pick up some nice fire roasted flavor. Since I can’t wait for corn season to have this addictive & savory snack, a bag’ll do just fine.
Get all your peppers diced – you can use a yellow in place of the orange if you want…..
…then try not to cry when you finely dice up that ½ onion.
This is one whole jalapeno pepper, seeded, matchsticked and VERY finely diced. You want it’s flavor throughout so dice it super small so it gets well distributed throughout the dish.
We add in sliced green onions into the mixture as well as a few on top of it.
I ask you – is there any better food than cheese? Jack melts beautifully – you’ll need about 12 oz. total – 8 to mix in and 4 for the top.
And of course – the garlic. Mince or press about 4 large cloves so you have a good, fat tablespoonful.
Add 1 T of butter to a hot skillet and pour in the corn. I like to make ‘holes’ in the corn ‘mass’ so heat gets through so it doesn’t just steam in the pan. Leave the corn to roast for a few minutes at a time and then stir. If you stir it the whole time, it won’t get any caramely colors to it ands won’t be as yum-tastic!
See? It’s getting there! I don’t wait for every kernel to get the golden brown color – but want a very good amount of them to be. Once it’s reached the desired ‘roastedness’, I empty the corn into a large bowl to wait while I finish cooking up the other veggies.
Next up, put the peppers (not the jalapeno) and onion in the hot pan. Add salt and pepper and stir-fry for about 2 minutes.
Mmmm....it’s all hot and steamy and smelling good! Steam doesn’t make for such a good picture though!
After two minutes, add the corn back to the pan and season with salt and pepper once again. Stir until combined…..
….then put the jalapeno and garlic in! OMG give this a good stir and you will immediately know what I meant about the garlic just ‘making’ this dish. The smell is unbelievable! Cook the mixture another 2 minutes, then transfer the lot of it to a large bowl to cool just a bit – maybe 20 minutes or so.
Once the mixture has cooled a little, stir in ¾ of the green onions and the mayo.
After those are well combined, add in ¾ of the cheese and mix well.
Spread in a casserole dish – size is sort of up to you… This is a Pampered Chef oval stoneware pan – it’s about the equivalent of a 9x13, but oval. I’ve used a big, round corningware dish as well and a dish a bit smaller so the dip was a bit thicker – but the above dish is my fave to use. The stoneware keeps it piping hot too – awesome. I think an 8x11 rectangle would be really close to this if you’re using a rectangle pan. Craaaapp….for something totally uncomplicated I’m making it way too complicated! Just use yer fave shallow-ish casserole dish!
Top with the remaining cheese and green onions. At this point, you can put it in the oven or, if you’re going to bake it within an hour or two, just cover it and leave it on the counter – no point in chilling it, making it take longer once you do bake it. If you won’t be needing it for several hours, cover it, chill it, then remove from the oven a good hour before baking. Bake at 350-degrees for 25 minutes if not chilled – or approx 50 minutes of it is chilled. The top should be golden and bubbly and the center should be good-n-hot (stick a knife in the center then feel the blade between your thumb and forefinger).
And Presto! Not only is it bubblin’ hot but the dish changed color and size as well! Okay –here’s the deal…I made the dish in all the prep pics a week ago but because guests were already at my house when it came out of the oven, I put it out onto the counter without taking a picture of the finished product! Oops! So, when the hubs had a friend to dinner this past Sunday (he brought the fresh-caught salmon in the dinner pic with the spicy green beans), I used the rest of the peppers and a smaller bag of corn to make a slightly smaller version of the original – and that’s it abov
Yum – hot and full of flavor……….That sweet corn with the peppers and garlic….OMG………
This dish is a home run – heck, you could probably eat is as an actual corn side dish and forget about scooping it up with chips! It takes a fair amount of dicing prep – but it’s SO worth it. Enjoy!
Roasted Corn Dip
Ingredients:
1 regular-sized bag frozen super sweet white corn
1 tablespoon butter
salt & pepper (pinches here and there to taste)
1/2 medium/large onion – finely diced
1/2 red, yellow and green bell pepper diced small
1 medium jalapeno, stemmed, seeded and diced very fine
1 tablespoon chopped garlic
1 cup mayonnaise
12 oz grated Monterey Jack Cheese
4 finely sliced green onions

Directions:
Heat a large skillet to high heat and melt 1 T of butter then add frozen corn. Allow corn to cook between stirrings to caramelize and turn golden on most kernels – about 7 minutes. Remove from pan to large mixing bowl. Add the onions and peppers. Season with salt and pepper. Sauté for 2 minutes. Add the corn back in and continue to sauté for 2 minutes – season with a little more salt and pepper. Add the jalapenos and garlic. Continue to cook for 1 minute. Remove from the heat and cool slightly, turning the mixture into the large mixing bowl. Once cooled a bit, stir in the mayonnaise and 3/4 of the cheese. Mix well. Stir in the ¾ of the green onions. Season with salt and pepper once again if necessary. Pour the mixture into a 6 cup oven-proof oval baking dish. Spread evenly and top with the remaining cheese and green onions. Bake for about 20 - 25 minutes or until bubbly (if you chill it after making it rather than putting it right into the oven, cook for approx 40 - 50 minutes)
Serve hot with tortilla chips